Pinterest Pin It

Showing posts with label Crafts/Hobbies. Show all posts

Thursday, January 16, 2014

From Old-Fashioned Tshirt to Cute Cardigan

Do any of you ladies remember wearing the horizontal-striped shirts from the late nineties that were slightly too wide and short? Those were quite 'in' I do remember and not only did I wear a lot of them but everyone I knew did too...especially adults. I was a teen then, but I remember VERY well.

I was recently given one of those horizontally stripped T's that was in excellent condition and had cute neutral colors. I did not have the heart to throw it away but wanted to somehow change it from the wide and short style it was. Then I remembered turning a Tshirt similar to this style into a cardigan last year but I didn't post about it. So cardigan it was...here is what I did.


1. Cut the shirt down the front middle.


2. Create a slight V by cutting off from the collar at an angle.


3. Fold over about an inch and pin down. Make sure it's inside out.


4. Sew. You can just fold and iron but then it doesn't stay like that, so I chose to sew. I bet that fabric glue would work just as well as sewing for this little job.


5. For the angles at the top I sewed it 'curly' style to keep it from fraying.


I did not like how it looked just like that...even though a belt would help...so I had the idea of adding a red ribbon to it.


6. Inside-out pin the back in thirds and then one in each front/side at the waste.


7. I quadrupled my string and looped it around my finger at each pin and then looped it through to prepare it for knotting when done with each.


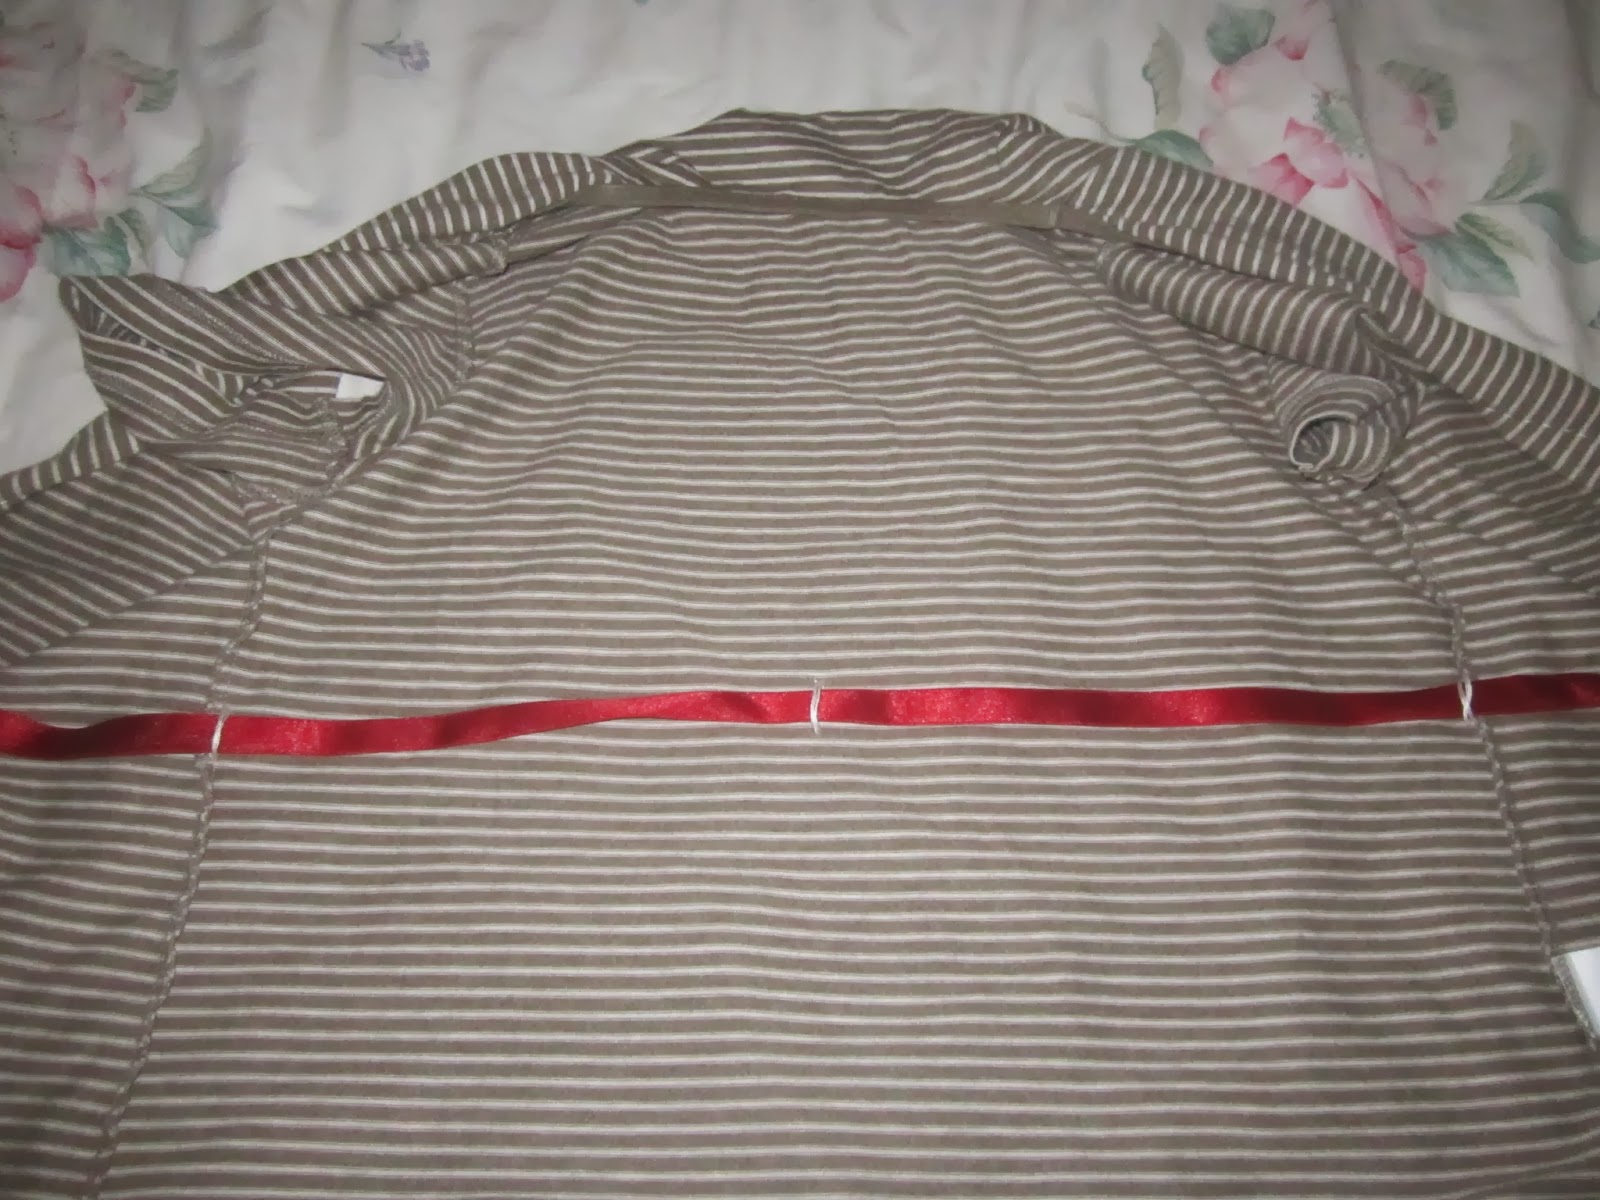
8. The back needed to be brought in some so I tucked and sewed inside at the back-center right under the loop.

And that's it.


I'm sorry for the wrinkles and that I didn't straighten it...but I just wanted to show you what it looked like at the back.

So before tossing your old striped shirts into the donation bag try considering first what you can do with it...the possibilities are endless. 
Enjoy!

By the way, I love comments. Hint, hint,wink, wink. 
What are some things you have done with your old tshirts?

Sunday, January 12, 2014

From Stained Maxi to Fab Skirt...

I form very tight-knit bonds with my clothes. For about four years I had this adorable baby blue maxi dress that I loved. 

A few weeks ago I planned to wear it to a 'pastel-inspired' banquet. When I pulled it out to change into I noticed some large stains on it. No matter what I did I could not get them out and to this day I have no idea what they were from. 

So there I was staring at my dress that I felt ashamed to toss out since it still had so much good fabric. Then the thought hit me, I will turn it into a skirt so it's not put to waste! Here is what I did...


1. Cut off the bottom half...the part that wasn't stained.


2. Because it was too wide, and I have to sew by hand, so I cut out a third of the fabric.


3. Pin together the new seem leaving the extra fabric out so it can be sewn.


4. Then sew. 


Here what it looks like after. I love how it ended up that the two seems on the skirt are close together...it gave a really cool effect which you will see later.


5. Pin in thirds the wide elastic band (which I took off of another skirt that it was just not working for) and pin in thirds the fabric.


6. This part is tricky. Making sure that it was inside out, I pinned the fabric to the elastic band following the pins. The extra fabric on the sides I folded over each being an inch wide.


7. I used the color of the fabric for the thread (which I think turned out cute) and I gave a double line for extra strength since it's hand-sewn and I'm really NOT a professional. Yes, the lines may not be perfectly parallel, but when wearing it a person can't see that anyways and it still looks cute. 


This is the inside-out view.

and now for the finished product...


I realize that most of you readers that sew have a sewing machine. With that then you have way more choices of how you can make your skirt. Just do some googling and pinning and find the style you want and go for it. However, I will admit that I love how this skirt turned out. The seems being in front gave it a slimming effect I think and the folds on top assisted my skirt in giving a more hour glass look. 

Happy sewing!

Wednesday, January 8, 2014

Crafts to do with a wide age-range of kids...

Hubby and I just recently had a week of watching a group of ten missionary kids all ranging from 7 to 18 years old. For most days we had a craft hour in which they each crafted their own version of the project for the day. Somehow, we were able to come up with specific crafts to do that attracted the entire range of ages.
Here is what we came up with...

1. Cards.
We supplied them with an abundant amount of supplies we were able to find throughout the city so they could make their cards look however they desired.
Be sure to have a butt-load of glue because no matter what adult says "A little bit of glue goes a long way..." the child will NOT believe them.


This one is my favorite. The youngest in the group ( 7yrs) made this. It was so heavy but he was so happy with it.

This card one of the older girls made. She kept it very simple. I thought it was very pretty.

2. The next project we did was very time consuming for me because I had a lot of prep work before-hand for it. I took thick cardboard and cut out individual letters of the first letter in their first name. I supplied yarn and cloth from an old shirt to add to the rest of the craft supplies they could use. Here were their results...
With this one, he cut triangles from construction paper and modge-podged it.


I will admit...this kid's was my favorite. It looks so cool!

This girl wrapped white ribbon then wrapped pink sheer ribbon on top, as you can see, then she took the various supplies and decorated it to her own liking.

This was once a button up shirt that the girl took and used to hot glue onto her 'S'. She left some of the buttons on and used ribbon for it to hang from.

This girl simply wrapped white ribbon all around the 'K'. 

3. The last day we let the older kids work on a toilet paper roll wall decor while the little kids played with all the paper and things that were left.

They first formed it into a star. Then hot glued them together one by one. After it was finished we took it outside and spray-painted it silver. We gave it two coats making sure to cover the entire thing. I was so proud of their work. 


One other thing we did that I absolutely MUST show you is a laser obstacle course made out of yarn and packaging tape.

The sun hit this just right. It looks awesome! I did take a lot of pictures of the kids taking turns going through it but in order to keep them anonymous I declined to post those. But as you can see in this picture all I did was take the yard and zig-zag it all around the gazebo with the chairs and tables in there and used packaging tape to stick it in place...it worked great!

Happy crafting!

Monday, December 17, 2012

Scrapbooking 'Photo Album Style'

I absolutely love to scrapbook. However, after seeing so many other women's scrapbook pages and so many on pinterest I have come to notice that my way isn't exactly scrapbooking. I don't know if there is a correct term to how I scrapbook or not but I call it 'photo album style'. I don't put just one or two pics on my pages and then put tons of big stuff all over that page...goodness sakes when I look at those I think "this page itself has to cost at least 20 or 25 or 30 bucks!"...NO THANK YOU.
Even though the typical way of scrapbooking is soooo pretty to look at I find it, for me anyways, to be a waste of all my pictures and well...of money. Women will spend hundreds and sometimes thousands of dollars a year on scrapbook stuff and that we do not have the budget for. 

It all started when Hubby and I were dating. He loves taking pictures and I had so many I didn't know what to do with them. So I started scrapbooking. My first one didn't turn out so good but the two after that I feel a little more proud of. 

This post today is a gathering of some of my pages and things I've done in my scrapbooking. I'll explain why I did things and how and give/show you pointers for recycling and saving money and making memories.

By the way you will notice that I have many pictures of people/names covered...even though that does take away from the page the pictures are not needed anyways for what I am talking about. Plus...I prefer privacy.


These are pictures of introduction pages. The introduction page I like to have as something that gives my viewer an idea of what the book is about.

Left: 23 is the number of the day we got engaged and married on. This picture (thus this is our engagement period album) is of a number given to us at a coffee shop we always went to (especially during our engaged months) and we were given this order number completely by coincidence. 
Below: The tree is a symbol of our next 'journey' after getting married...thus this book is of our few years here in the current state.


                                                                     Recycling:

Here I have a song cut out of a card sent to me. I thought that not only the color went well with my brown background but the song itself was great for the meaning behind it...(a good relationship must start with a good foundation built on the solid rock.)

The peacock feather you see here is a prop from a costume hat of mine that fell out. We were in a musical together and that hat was worn at that musical. Also I am sure you see the movie tickets...those are from our first movies we went and saw together.


At the top left the two hearts were cut out of one of our wedding cards. To the right I  cut the calendar month out and replaced it with a picture. Below it is a verse that went well with the theme.


Here are two doves I cut out of a card. Yes tedious but worth it.

This is the front of a card we received. I placed a blue paper behind it, sizing it correctly, it looks like a normal picture with all the others. Folks ask me every time if that was our breakfast the next day and I just giggle and say no that is from a card we got.
*Using cards/things from cards for your scrapbooking not only provides great props for your pages but also lets you use them instead of just storing them in a box or throwing them away.

To the bottom right you'll see the small blue square with writing on it...that was cut out of a card as well. I just placed it on top of a larger green paper I cut out. I love the color contrasts.


The lined background for the verse was from a cute gift bag. The heart and fishes were from a card.  *What I did wrong...it's a little cluttered looking and I don't like it on that paper. But I still love the props anyways.

I love using dove wrappers that I've smoothed out. Some of them have cute quotes that go well with the page themes.


In this tiny gift bag was a gift given to me from Hubby for Christmas.

I love finding cards from the dollar stores. For this one I just  cut the front off...it already had a rectangular hole in it to use.
At the top right of this one is a quote cut out of a card. Under it is a note one of us gave to the other and the golden butterfly is also from a card. The yellow ribbon was from something else...all though I can't remember what from.

Last year my father passed away from cancer. The background of this picture is the front of one of the sympathy cards I received. The quote underneath is from the inside of that card.

I have a friend with the amazing gift of crafting. She crafts so many amazing things. It's as if anything the girl puts her hands on she makes gorgeous...well the high heal and flowers were taken off a card she had made me; I also included her note from the card which you see there in the middle.

Here I cut out a wedding dress and groom tux out of a gift bag.


........


This page is of me getting ready for my wedding day. I have numbered each one showing from where I started to how I looked when I finished. In the middle I captioned 'The Transformation'.
I prefer to make my side by side pages to not clash with each other. However even more so, in this book (my wedding book), I have one side plane pink with the other side's paper lined with my wedding colors...I themed the entire book with those colors. Green, Pink, and Yellow.
*By the way...those long skinny flowers there to the bottom right were from the topper of my cake.
Since this paper is already busy I tried to keep away from using too many 'props' on it. Instead I used black lettering and plane green backgrounds for the pictures to bring them out.

At the top right I have a left over insert from our cards for where we registered. I also used white lettering which I felt went the best with the colors I chose. I absolutely love this page. I used the yellow ribbon in opposite corners overlapping the corners of the picture.
*You've probably already noticed this in some of the other pictures but I cut Hubby and I out and put us in the bottom left corner. But be sure when doing that that it won't blend with the page but instead it will stand out in a non-contrasting manner.
Here I used white letters on a picture of guests watching the ceremony. White stands out better than black most times....depending on the colors you use. *Make sure when doing that to not let it take away from the picture itself.

When I place 'stickers' on pictures I don't place them in 'middles'....unless it's the bottom middle....but even then I use about 60% on picture and 40% on paper or visa-versa.

This is probably my most beloved page by friends. I used a neon green paper and then black and white pictures and black and white printed tissue paper from wedding gifts. I love the contrast. 


I wish I didn't need to cover these...but this world is full of crazies, so I sacrifice showing pics. Here I have a picture of each 'new family' (aka each of my sister's family's and Hubby and I) and then all of us together. I used punch out letters for naming each family. I also used paper that didn't clash with the background but also matched that family's personality. In the future I'll get to make a whole new page of families for whenever my little brother gets married.


On the left page hopefully you can see the bottom right picture, I traced around another shape I had from an old punch out and 'framed' around the focal point of that pic...in this instance it was my nephew.
*Instead of tossing out the pages with no more punch outs check first to see if it would be useful as a tracing device. Those work great.
*Notice how the colors flow together?
I prefer using doilies as backgrounds. Here I cut out me hugging my dad and placed it not quite in the middle but towards the side a bit on top of the doily. It made it a great focal point for the page.


...........


You see? You do not have to spend a ton of money to have a hobby and to do it well. Use your imagination. You don't have to be like everyone else. Just find what you can do and use and then make it happen. Usually we all have things in our homes lying around that can be used as 'props' for our hobbies/crafts. Decide what is worthy to spend money on and what isn't. I even use milk carton rings and glue them around a picture I cut out to the size and shape of the ring! It works great!

By the way...usually the clear sleeves I put the pages in come with a white 12X12 paper already in it! I use that as background paper for pictures, pages themselves, and for cards as well! They don't need to be tossed either!

Have fun and have a great day!